How to Properly Indent in Word: Enhance Your Document Format in 2025
Learning how to indent in Word is crucial for creating polished documents that enhance readability and presentation. In 2025, mastering the art of indenting paragraphs in Word will not only help in organizing your text better but also in adhering to professional standards of document formatting. This comprehensive guide will walk you through various methods of setting indents in Word, ensuring you maximize the effectiveness of your formatting techniques.
Understanding Word Indentation Options
The first step to mastering **indentation in Word** is understanding the various **Word indentation options** available. It’s essential to know that Word offers multiple ways to manage indents that cater to different formatting needs. For example, adjusting indentation in Word can include first-line, hanging, and block indent styles. First-line indents are typically used to signify the start of a new paragraph, whereas hanging indents help identify list entries or citations. By comprehensively understanding these **indentation guidelines in Word**, you can choose the style that best suits your document’s purpose.
Exploring Indentation Settings
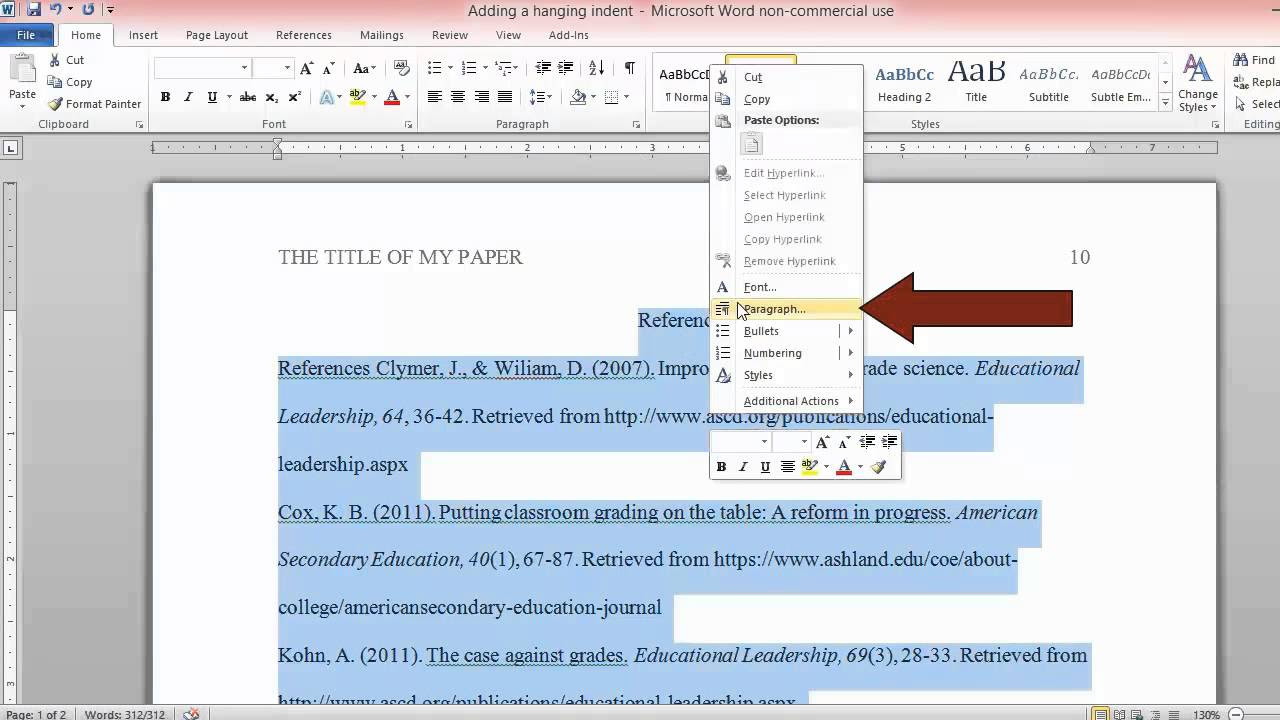
To begin using the indentation settings, navigate to the **Word paragraph settings** in the ‘Paragraph’ group under the Home tab. Here you will find detailed options, such as alignments, line spacing, and that can be customized to meet your requirements. For instance, select ‘Hanging’ under the special indent option to create a list format where only the first line aligns to the left margin while the rest indents. This feature greatly enhances the structure of lists and bibliographies.
How to Adjust Margins and Indents
Adjusting margins and indents in Word is simple and effective. To modify margins, go to the ‘Layout’ tab and select ‘Margins.’ You can choose a preset option or create custom margins based on your document requirements. After setting margins, you can manage indents by dragging the sliders on the ruler at the top of your Word interface. This method allows for precise control and is especially useful when you want to create **custom indents in Word** for specific paragraphs.
Quick Indentation Techniques in Word
If you need to apply **quick indents in Word**, utilizing keyboard shortcuts can significantly streamline your formatting process. Most users are unaware that Word provides built-in shortcuts to indent paragraphs swiftly. For example, pressing ‘Tab’ indents your paragraph, while ‘Shift + Tab’ decreases the indent level. Familiarizing yourself with these shortcuts can improve your workflow, especially during editing or organizing documents that require multiple adjustments to formatting.
Using the Ruler for Indents
You can also achieve effective indentation by **using the ruler for indents** in Word. To enable this feature, ensure that your ruler is visible by checking the ‘View’ tab and selecting ‘Ruler.’ Once activated, you can manually adjust the first-line and hanging indents by dragging the respective markers on the ruler. This hands-on approach allows for quick visual adjustments and provides a tactile method for managing your document layout.
Creating Hanging Indents in Word
Creating hanging indents in Word is especially beneficial for formatting reference lists or bibliographies. To set this up, go to the ‘Paragraph’ dialog box, select ‘Hanging’ from the special options, and specify the indent size. This method ensures that only the first line of each entry aligns with the left margin, making it easier for readers to browse through citations. **Understanding how to create hanging indents** will greatly enhance the clarity and organization of your documents.
Formatting Text for Enhanced Readability
Proper text formatting significantly enhances the readability and overall appeal of your documents. Whether you are drafting a report, a letter, or an essay, understanding **how to enhance readability in Word** by using effective indents and spacing is necessary. Adjusting line spacing, selecting appropriate font styles, and leveraging indentation can lead to a more visually appealing layout. Emphasizing these areas transforms the document’s aesthetic, promoting better engagement from your readers.
Applying Bullet and Number List Indents
Indentation is crucial when formatting lists. When **indentating lists in Word**, using the bullet or numbering features also helps in aligning your text properly. Through the sentence and list styles, Word allows you to customize the indentation for bullets and numbered lists easily. Users can do this through the paragraph settings or the options available when creating lists. Understanding how to implement these features will save time and exert a professional touch to your documents.
Repeating Indent Settings Across Documents
Another important aspect of **repeating indent settings** is creating a consistent look in your documents. If you have established a layout you like, many users tend to find joy in utilizing the **styles feature** in Word. By selecting ‘Paragraph Styles,’ you can save your custom indentation settings and quickly apply them across different sections of your document, or even to new documents in the future, ensuring uniformity in formatting without hassle.
Conclusion
With the valuable skills learned from this guide on **how to indent in Word**, managing your document layout has become more user-friendly and proficient. Implementing proper indentation techniques enhances the overall readability and professionalism of your documents. Whether you’re formatting lists with hanging indents, adjusting margins, or adopting quick techniques for indentation, these practices will significantly elevate your Word processing capabilities in 2025 and beyond. Now that you have these insights, create well-organized and visually appealing documents that convey your messages effectively!
FAQ
1. What is the best way to create hanging indents in Word?
To create hanging indents in Word, go to the ‘Paragraph’ dialog box, choose ‘Hanging’ from the special indentation section, and set your desired indent measurement. This format is often used for bibliographies and references to enhance structure.
2. Can I use keyboard shortcuts for indenting in Word?
Yes! You can conveniently use keyboard shortcuts such as ‘Tab’ to indent a paragraph and ‘Shift + Tab’ to decrease the level of indentation. These shortcuts can speed up your editing and formatting processes.
3. How can I modify paragraph indent settings in Word?
To modify paragraph indent settings, select your text, go to the ‘Paragraph’ dialog box through the Home tab, and adjust the indent settings as needed. You can set first-line, hanging, or left and right indents based on your requirements.
4. Where can I find the indent options in Word?
The indent options can be found in the ‘Paragraph’ group in the Home tab. Clicking the dialog launcher allows you to explore various paragraph formatting options, including indentation styles.
5. How do I apply standard indents for different types of documents?
Applying standard indents involves knowing the expected format for your document type, be it a business letter, academic paper, or report. Check any style guidelines, and then set your paragraph indents accordingly using the ‘Paragraph’ settings in Word.
6. How can I manage text alignment alongside indents?
Managing text alignment in conjunction with indents is doable in the ‘Paragraph’ settings. Choose your alignment type (left, center, right, or justified) while setting up the indents to achieve the perfect layout for your document.
7. What tools in Word can help me with effective document formatting?
Word offers a variety of tools like paragraph styles, the ruler for manual adjustments, and keyboard shortcuts to assist with **effective document formatting**. Familiarizing yourself with these will simplify the formatting process.