“`html
How to Properly Lay Pavers: A Smart Guide for a Flawless Patio in 2025
Understanding Paver Base Preparation
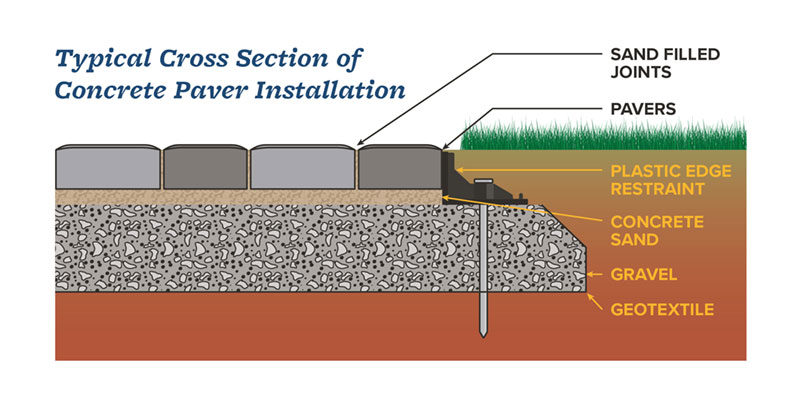
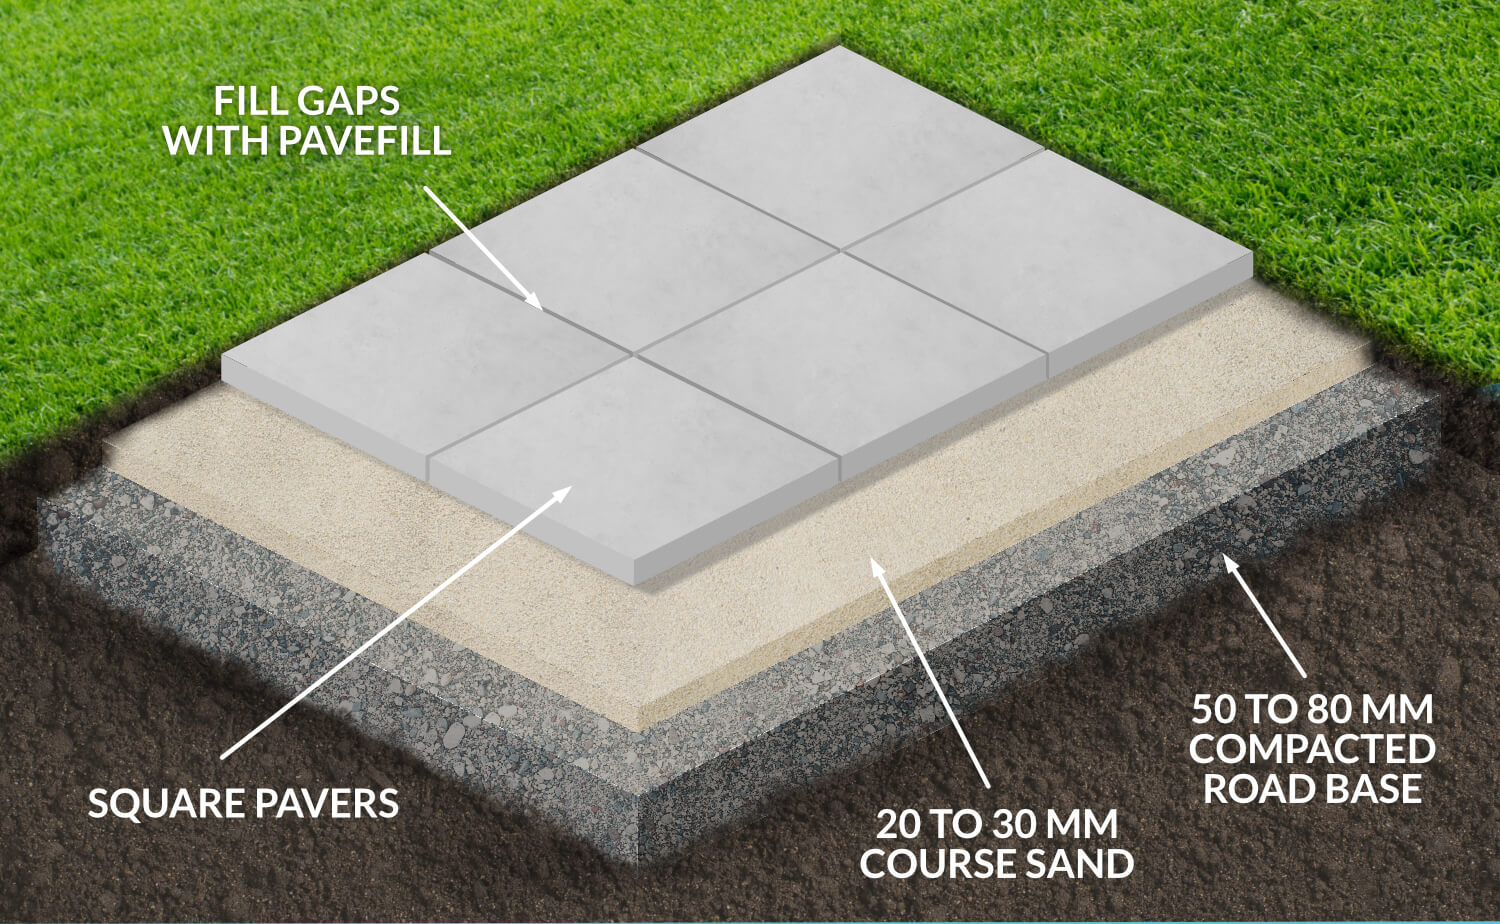
Before diving into how to lay pavers, it’s crucial to understand the concept of paver base preparation. The base acts as the foundation of your patio, ensuring that the pavers are stable and aesthetically pleasing. Begin by excavating the area where you plan to install the patio, reaching a depth of about 6-8 inches. Fill this space with a layer of gravel, which promotes drainage and prevents shifting. Compact the gravel firmly using a plate compactor to create a solid base. The better your base preparation, the more durable and long-lasting your paved surface will be.
The Importance of Proper Drainage
One key aspect of outdoor paver installation is ensuring adequate drainage. Failing to incorporate adequate drainage can lead to issues such as water pooling or erosion. Use a **drainage pipe** or *French drain* system to direct water away from the paved area. Ensure that the base slopes away from buildings by at least 2% to prevent flooding. Installing permeable pavers can also enhance your drainage, encouraging the absorption of rainwater back into the ground.
Choosing the Right Materials for Your Base
When it comes to preparing your base for laying pavers, selecting the right materials is essential. Utilize a combination of gravel and sand, where gravel provides overall stability and drainage, while a fine layer of sand smoothens the surface. Options like bank run gravel are popular as they pack well and provide an excellent foundation. Knowledge about these materials is crucial as it directly impacts the integrity of your residential paver projects.
Laying Pavers Step by Step
Now that you have properly prepared the base, it’s time to delve into the comprehensive paver installation guide. This step-by-step process ensures that you lay pavers effectively and efficiently, enhancing both the functionality and visual appeal of your outdoor space.
Step 1: Planning Your Paver Layout
Before installation, spend some time planning your paver layout. This involves determining the **paver design ideas** and patterns that will complement your landscape. Use string lines and stakes to outline your design, marking where the pavers will go. Consider choosing interlocking versus non-interlocking pavers based on your design preferences. An accurate layout helps to visualize the project and prevent unnecessary cutting or adjustments later.
Step 2: Cutting and Fitting the Pavers
Once the layout is established, the next step involves **cutting pavers on site** if needed. For that, a **rubber mallet**, **leveling sand**, and appropriate **paver cutting tools** such as a wet saw or paver splitter are essential. Carefully cut pavers to fit around edges or obstacles to ensure a neat finish. Maintaining a uniform joint size is also critical; aim for approximately half an inch for aesthetic balance.
Step 3: Filling the Joints and Sealing the Pavers
After laying all your pavers, the next crucial step is paver joint filling. Use polymeric sand for its locking properties that help hinder weed growth and insect infestation. Spread the sand over the pavers and sweep it into the joints. Once filled, mist the surface lightly with water to activate the bonding agents in the sand. Sealing your pavers is often recommended to protect against staining and to enhance their color and finish, thus assuring longevity in your outdoor space.
Common Mistakes to Avoid When Installing Pavers
Even seasoned DIYers can make critical mistakes in their layouts and design while installing pavers. Here are some common pitfalls to avoid when learning how to lay pavers.
Lack of Base Preparation
Skimping on the paver base preparation often leads to settling and uneven surfaces. Ensure you have at least a 4 to 6-inch base of compacted gravel before laying your pavers. Be mindful not to rush through this step; its importance can’t be overstated.
Ignoring Grading and Drainage
Failure to address drainage and grading will create long-term issues with standing water and erosion. When planning, remember to create a slope that directs water away and ensure the proper layout for any drainage solutions. Utilizing eco-friendly paver options and permeable surfaces can also be beneficial.
Not Following a Clear Layout Plan
Installing pavers without a clear plan or layout can result in uneven spaces and exhausting rework. Always measure and mark out your layout before starting, and take care in cutting edges to avoid waste and maintain symmetry.
Paver Care and Maintenance Tips
Once your pavers are laid down beautifully, establishing a proper maintenance routine is vital for longevity. Here are essential paver care and maintenance tips to help keep your patio looking fresh.
Regular Cleaning and Sealing
Plan for a regular schedule for cleaning your pavers. Use a broom or leaf blower to clear debris. Every few years, consider cleaning the surface with a pressure washer to remove stubborn stains. After cleaning, resurfacing with a suitable sealant offers protection against fading and inhibits mold growth.
Weed Prevention and Joint Maintenance
Weeds can be a common issue between paver joints. Regularly check joint areas and remove weeds as soon as they appear. Refill empty joints with polymeric sand to avoid weed growth. This quick maintenance task not only helps enhance the aesthetics but prolongs the lifespan of your paver installation.
Addressing Repair Needs Promptly
Be vigilant in inspecting your pavers for any unevenness or cracking. Should you notice any issues, consider looking into fixing uneven pavers promptly to prevent further complications. Check for sunken pavers and replenish the base material if necessary. Early intervention can save significant repair costs down the line.
Key Takeaways
- The importance of thorough base preparation cannot be understated.
- Follow a systematic approach in laying pavers with a clear layout plan.
- Regular maintenance involves cleaning, sealing, and weed management.
- Be proactive in addressing repair needs to extend the lifespan of your pavers.
- Creative design choices enhance the aesthetic and functional value of outdoor spaces.
FAQ
1. What are the best paver materials for patios?
The best paver materials for patios typically include concrete, brick, and natural stone. Each material has unique benefits, such as durability and aesthetic appeal, which can significantly impact the overall look of your outdoor living area.
2. How do I calculate the cost of paver installation?
Estimating paver costs involves calculating both the material and labor costs. Measure the area to determine how many pavers are needed, considering size and design. Factor in additional costs for base material and any hiring of paver installation services if necessary.
3. Can I lay pavers on dirt?
Laying pavers directly on dirt is not advisable as it can lead to shifting and uneven surfaces. Always prepare a solid gravel base for the best results and durability.
4. What types of paver patterns are available?
Choosing paver patterns can significantly impact your design. Common patterns include running bond, herringbone, and basket weave – each creating a unique style and feel for the space.
5. How often should I seal my pavers?
It’s recommended to seal your pavers every 2-3 years, or depending on the product used and environmental wear. Sealing not only protects from stains but also enhances the pavers’ color and finish.
“`